CubicLabs, Inc. In- Vehicle Test, Measurement, and
Control
Equipment
CubicLabs, Inc. In- Vehicle Test, Measurement, and
Control
Equipment
![]()
![]()
For information, please send an email to:
or call:
(734) 426-0872
|
|
|
Analog Output / External Amplifier User's Guide The FireLynx Control Module Analog Outputs provide the ability to drive loads with a programmable analog waveform. These waveforms include "segmented" and "peak/hold" waveforms. The ability to add "dither" to the waveform is also provided. These will be discussed later in this User’s Guide. The Analog Outputs work together with the internal digital outputs, which are used as gates, and an External Amplifier. These are the currently available amplifiers: P/N Drive Levels Supply Voltage Standard Scaling SP031 Up to 30 Volts / 10 Amps. 9 – 36 Volts 2 Amps/Volt 6 Volts/Volt SP032/1 Up to 60 Volts / 30 Amps. 36 – 75 Volts 6 Amps/Volt 12 Volts/Volt SP032/2 Up to 150 Volts / 20 Amps. 100 – 170 Volts 4 Amps/Volt 30 Volts/Volt Contact Cubic Systems for price and availability.
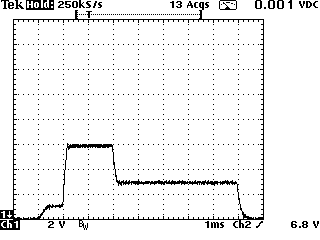
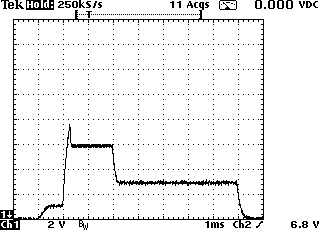
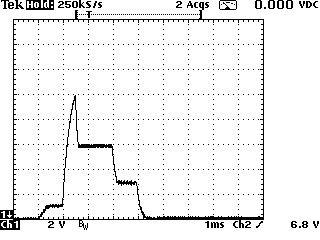
Here are two examples of the kinds of waveforms that can be created using the Analog Output / External Amplifier combination:
The waveform on the left shows a segmented waveform with a 1A pre-charge current, a 10A peak current, a 6A initial hold current, and a 3A final hold current with dither. The waveform on the right shows a peak/hold waveform with a 3A peak current and a 1A hold current with dither. 1. Before connecting the power supply to the FireLynx External Amplifier, adjust the power supply to the proper voltage. The voltage should be at least 10 volts above the highest load voltage.
2. Adjust the current limiting on the power supply for the lowest practical level. Note that short duration pulses can often be a much higher current than the set current limit. 3. Turn off the power supply. 4. Connect the power supply to the External Amplifier. Positive to Supply+; Negative to Supply-. Do not connect the load at this time. 5. Verify that all connections between the FireLynx and the External Amplifier are in place. Verify that the serial port is connected to the PC and the PC is running the FireLynx software. Make sure the correct COM port is selected. 6. Turn on the power supply. If the power supply goes into current limiting for more than a second, shut off the power supply and recheck all connections. 7. Make sure that channel 1 is set to Invert the output. Failure to do this operation could result in a continuous current through the load and its possible destruction. Make sure that the Voltage and Current Scales are each set to zero. 8. Connect the load to the Load terminals of the External Amplifier. There should be no change in the power supply current when the load is connected. 9. Enter the Voltage and Current Scales into the software that is listed on the External Amplifier. 10. The External Amplifier is now ready to be configured using the FireLynx software.
When the FireLynx Control Software detects Analog Outputs in the FireLynx Control Module, it will display the following screen:
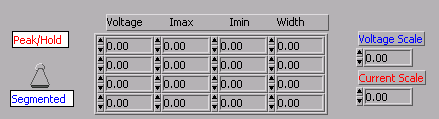
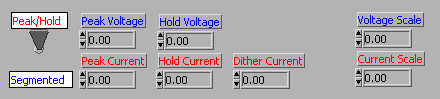
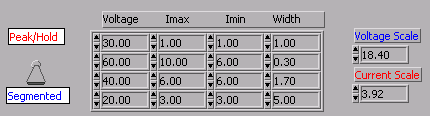
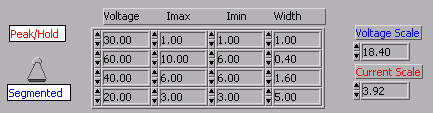
The entries all default to zero and the mode defaults to "segmented" when the software is run. These parameters can be entered at any time and will take effect on the first output (gate) after the value is entered. If the analog mode switch is toggled to the peak/hold mode, the following screen is displayed:
Important setup note: When setting up an output for use with an External Amplifier, the polarity must be inverted or the load will be continuously energized!
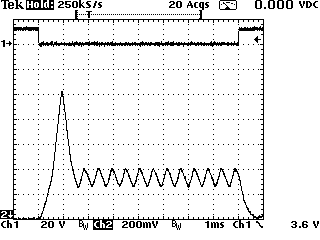
The following waveforms are examples of segmented waveforms that can be produced using the FireLynx with the Analog Output / External Amplifier option. All waveforms were produced using a SP032/1 driving a fuel injector. Power was supplied using a 75 volts, 4 amp power supply. (Transient currents in excess of 4 amps are possible due to capacitance in the power supply and the External Amplifier) Here are the steps one would go through to create the waveform on the Introduction page: First setup the Voltage Scale and Current Scale. Then setup the basic shape of the waveform. Since the waveform includes a peak for segment 2, set its Imin to the level of segment 3 and its width to 100uS. Lets ignore the dither on segment 4 for now. Here is the resulting waveform: 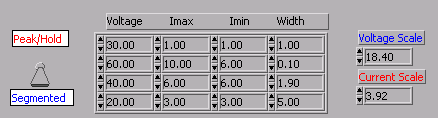
Now increase the width of segment 2 and decrease the width of segment 3: 
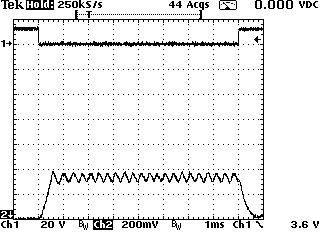
Continue to increase the width of segment 2 and decrease the width of segment 3:
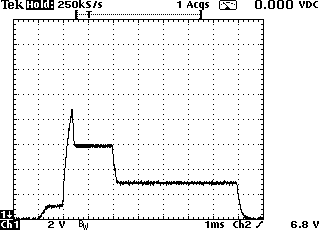
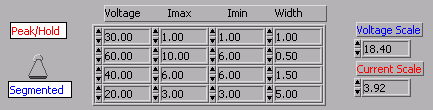
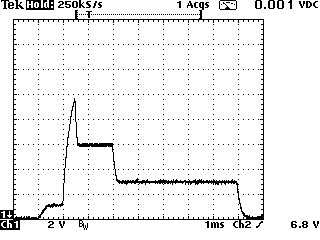
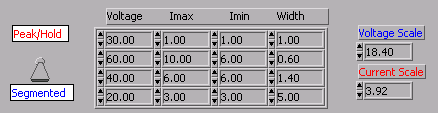
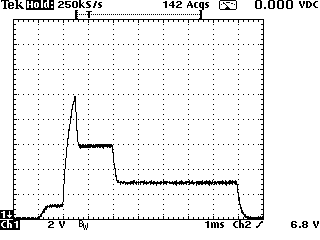
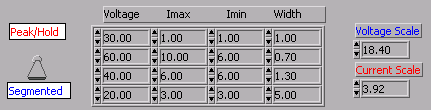
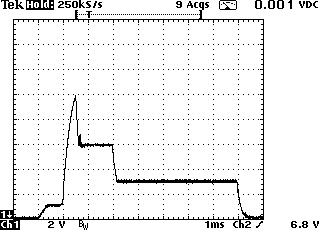
The last plot shows that the current peaked at 10A, fell to 6A, and began to rise again. Since 700uS is too much and 500uS does not quite reach 10A, 600uS is the best selection for this load. Note that changes in the load or in the applied voltage will change the rise time and the width may have to be changed. Now lets add in the dither: 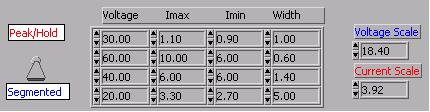
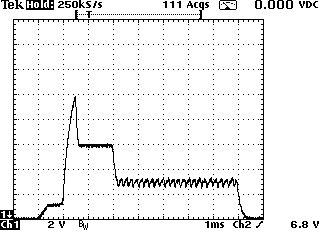
Also note that the width of the gate can be anything less than the sum of the segments width. Here is the pre-dithered signal with the width changed from 8mS to 4mS:
The following waveforms are examples of peak/hold waveforms that can be produced using the FireLynx with the Analog Output / External Amplifier option. All waveforms were produced using a SP032/1 driving a fuel injector. Power was supplied using a 75 volts, 4 amp power supply.
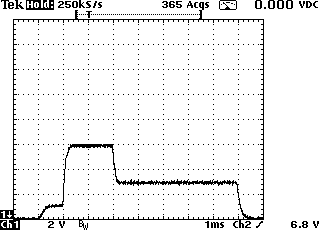
Here is an example of an output with no dither: 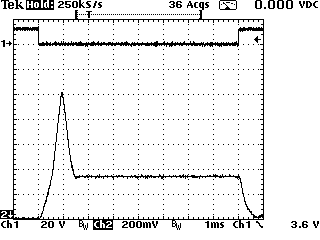
Peak Voltage 30 volts Hold Voltage 15 volts Peak Current 3 amps Hold Current 1 amp Dither Current 0 amp
Peak Voltage 30 volts Hold Voltage 15 volts Peak Current 3 amps Hold Current 1 amp Dither Current 0.1 amp Here is an output with "no" Peak Current and "no" Peak Voltage: 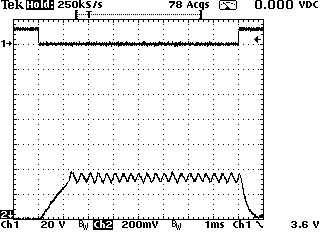
Peak Voltage 15 volts Hold Voltage 15 volts Peak Current 1 amp Hold Current 1 amp Dither Current 0.1 amp
For a faster rise time, the output is given a Peak Voltage:
Peak Voltage 30 volts Hold Voltage 15 volts Peak Current 1 amp Hold Current 1 amp Dither Current 0.1 amp Here is the output with even a faster rise time: 
Peak Voltage 60 volts Hold Voltage 15 volts Peak Current 1 amp Hold Current 1 amp Dither Current 0.1 amp FireLYNX Control Software
User's Guide The FireLYNX Control Software allows the user to get maximum flexibility with maximum ease of use from the FireLYNX Control Module. The FireLYNX Control Software lets the user configure the 12 output channels and 4 trigger input channels for use in fuel injector control and other engine development and testing applications. Sixteen different setups can be created and saved using the FireLYNX Control Software. Just as easily, any of the stored setups can be recalled with a few mouse clicks. The FireLYNX Control Software also functions as a convenient and simple to use display to follow the function of the FireLYNX Control Module. The next few pages describe the function of each of the controls on the FireLYNX Software screen. The controls are broken up into their general function (system, waveform, operation, and test) to simplify matters.
FireLYNX System Requirements FireLYNX Software is supplied on CD-ROM. The software may be run on any Windows 95, Windows 98, or Windows NT based PC or laptop having an available RS-232 serial port.
FireLYNX Software Installation 1) Create a Folder named "FireLYNX" using the Windows Explorer program (included with Microsoft Windows) on the disk drive of your choice (usually drive "C"). 2) Copy (or "drag and drop") the contents of the FireLYNX CD into this newly created folder. 3) Use the Windows Explorer program to copy a Shortcut to FireLYNX on to your Windows Desktop. After hardware installation has been performed, you may double click on the FireLYNX program icon to run the software.
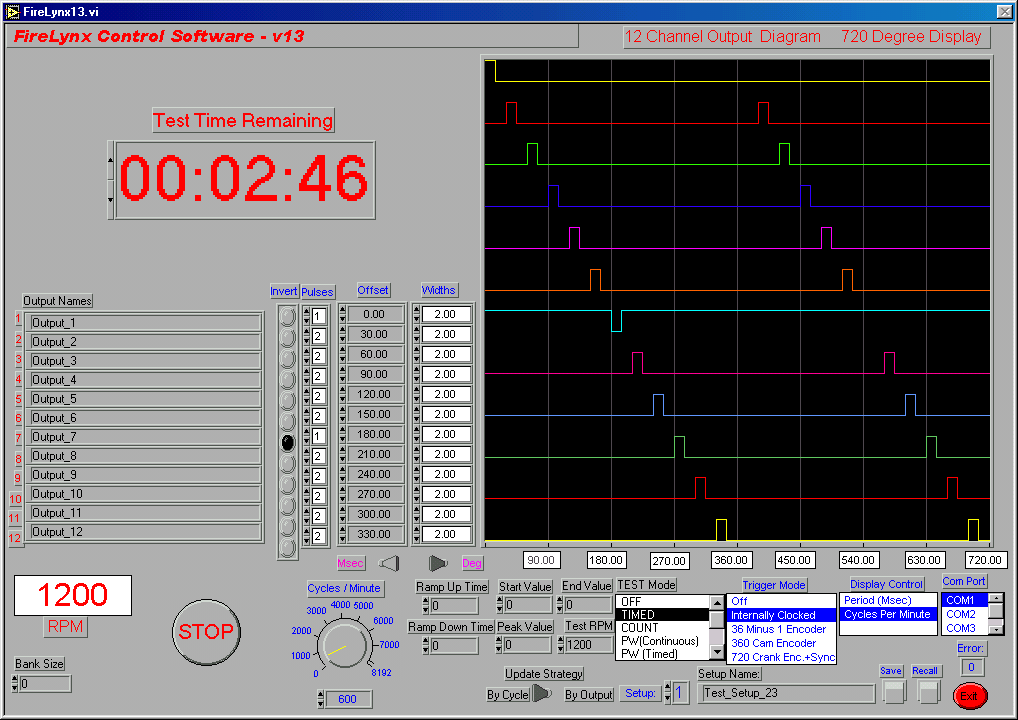
The FireLYNX System control functions appear on the lower right portion of the FireLYNX software control panel, below the output channel Waveform graphic display. The following functions control the communications to the FireLYNX Control Module and exiting the software:
The Com Port Control determines which PC communications port will be used to control FireLYNX hardware. A non-zero Error value indicates an unsupported communications port setting.
The Exit Control terminates FireLYNX software operation and returns the user to Windows. Use of this control does not affect FireLYNX hardware operation in any way, and should not be used in lieu of the STOP control.
Output Waveform Control Functions
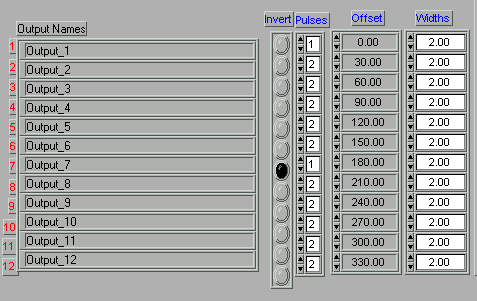
The FireLYNX output waveform control functions sub-panel appears on the middle left portion of the FireLYNX software control panel, next to the output channel Waveform graphic display. Twelve output channel numbers appear in red on the left of each output channel. Every FireLYNX output is individually programmable using the following controls:
The Output Names Control The Output Names controls allow the user to change the name of each of the 12 output channels. Names cannot contain spaces and must be 30 characters or less.
The Invert Control The Invert controls allow the user to selectively change the sense of each of the 12 output channels. When the Invert pushbutton for a particular output channel is black, the corresponding output channel is in the "Inverted" or "negative logic" state. This "active low" driven output is typically used for "low side drive" of Fuel Injectors or solenoids. When the Invert pushbutton is gray, the corresponding output channel is in the "Non-Inverted" or "positive logic" state. This "active high" driven output is typically used to provide an output trigger for external data acquisition equipment, or for driving relays or other external equipment.
The Pulses Control The Pulses controls allow the user to select the number of output pulses to be driven during a complete 720 degree firing cycle. The output pulses will be evenly spaced throughout the firing cycle. Up to 4 output pulses may be programmed for firing during the complete cycle, starting from the user specified Offset. Output pulses will "wrap" around to the start of each firing cycle, depending on the number of Pulses as well as upon the user selected Offset and Widths values.
The Offset Control The Offset controls allow the user to specify a unique Offset to occur prior to the firing of an output pulse in the firing cycle. Time offsets may be specified in milliseconds or degrees as determined by the Unit Selector Control below. Fractional entries are supported to two decimal places. Output pulses will "wrap" around to the start of each firing cycle, depending on the number of Pulses as well as upon the user selected Offset and Widths values.
The Widths Control The Widths controls allow the user to specify a unique Pulse Width for an output channel in the firing cycle. Pulse widths may be specified in milliseconds or degrees as determined by the Unit Selector Control below. Fractional entries are supported to two decimal places. Output pulses will "wrap" around to the start of each firing cycle, depending on the number of Pulses as well as upon the user selected Offset and Widths values.
The Units Selector Control specifies the units to be used for subsequent numeric entry and display of FireLYNX output Waveform pulse Offsets and Widths. The Units Selector Control may be operated at any time in the programming or operation of FireLYNX. The channel output Waveform display and control bank will update dynamically as this control is operated. Use this control to specify relative or absolute values for pulse Offset and Widths. Units selection may be mixed, as shown above, which displays the selection of Millisecond values for pulse Offsets and Degree values for pulse Widths.
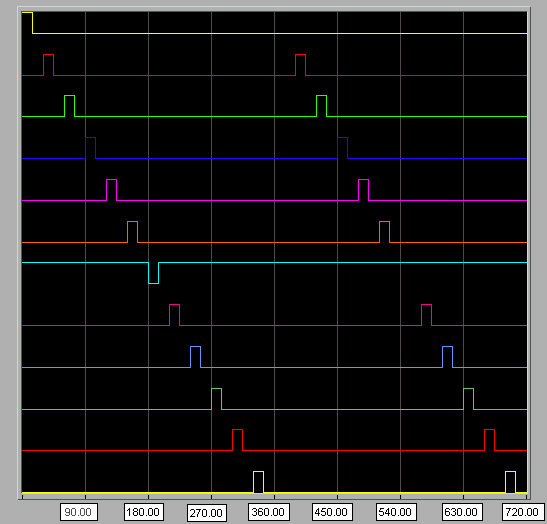
The Channel Output Diagram is a graphic representation of FireLYNX output waveforms as they appear in real time. The channel output waveforms are color coded for quick identification during FireLYNX operation. The output Waveform graph is updated in real time and responds to any change in system RPM, input trigger pulses, or other operational settings. Immediately below the output Waveform graph is an array of time offset indicators to provide a dynamic scale for the graph above. Eight time divisions for the firing cycle are provided with a fractional resolution of two decimal places. The time offset indicators are in units of milliseconds or degrees depending on the setting of the Display Control.
The FireLYNX operation control functions appear on lower portion of the FireLYNX software control panel, below the output channel Waveform graphic display on either side of the Test Control Functions. The following controls determine the overall operation of the FireLYNX Control Module:
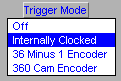
The Trigger Mode Control provides the mechanism for setting FireLYNX operation. The Off selection disables FireLYNX outputs and sets the RPM to Zero. Internally Clocked sets FireLYNX to output waveforms based on internal timing. This selection allows FireLYNX to ignore any input trigger pulses. 36 Minus 1 Encoder programs FireLYNX to generate output pulse waveforms which are synchronized to the input trigger associated with a user supplied encoder using a missing tooth algorithm. 360 Cam Encoder programs FireLYNX to generate output pulse waveforms which are synchronized to the input triggers associated with a user supplied encoder using a "top dead center" algorithm.
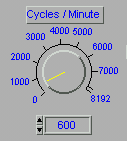
The Speed control is used to select FireLYNX output Waveform generation rates when in Internally Clocked Mode. The output Waveform display is continuously updated to reflect any changes in this control. The units of this control are determined by the Display Control below.
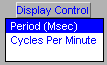
The Display Control permits user selection of control and display of output waveforms to be represented in terms of the firing Period or firing rate expressed in Cycles Per Minute. This control affects the operation of the Speed control and the Channel Output diagram.
The RUN/STOP Control immediately commands the FireLYNX Control Module to start or stop the generation of outputs. In normal non-test modes it will always say STOP.
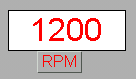
The RPM Indicator provides a continuous display of FireLYNX output firing rate. This is independent of the Display Control and the Trigger Mode Control.
The Setup control is used to Save or Recall FireLYNX programs in the Flash memory in the FireLYNX Control Module. Up to 16 setups may be stored in the FireLYNX. The user may select a setup number and Save a new setup or Recall a previously saved Setup at any time. The user may also give each setup a unique name up to 40 characters long. FireLYNX retains the saved setup information even when power is removed. Upon Power Up, the FireLYNX Control Module recalls setup number 1 and immediately executes its programming. This operation is independent of being connected to a computer running FireLYNX software and is what allows "stand alone" operation.
The FireLYNX Test Control functions appear on the lower middle portion of the FireLYNX software control panel, below the output channel Waveform graphic display. The following functions control special test modes of operation:
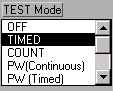
The Test Mode Control selects which of the available test modes is in operation. Note that the Trigger Mode Control must be set to Internally Clocked for any test mode other than OFF. OFF selects the normal continuous mode of operation. TIMED selects a test whose duration is limited by time. Waveform parameters can be changed manually. COUNT selects a test whose duration is limited by the number of output cycles (720 degrees). Waveform parameters can be changed manually. PW (Continuous) selects a continuous test. Pulse widths are swept according to the Test Parameters Controls below. PW (Timed) selects a test whose duration is limited by time. Pulse widths are swept according to the Test Parameters Controls below. PW (Count) selects a test whose duration is limited by the number of sweep cycles. Pulse widths are swept according to the Test Parameters Controls below. RPM (Continuous) selects a continuous test. Speed is swept according to the Test Parameters Controls below. RPM (Timed) selects a test whose duration is limited by time. Speed is swept according to the Test Parameters Controls below. RPM (Count) selects a test whose duration is limited by the number of sweep cycles. Speed is swept according to the Test Parameters Controls below.
The Update Strategy Control determines when new calculated values for each output go into effect. When the control is set to "By Cycle", the sweeping parameter is updated after each output cycle (720 degrees). When the control is set to "By Output", the sweeping parameter is updated for each pulse that is generated.
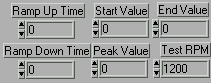
The Test Parameters Controls determine the sweep parameters for certain test modes. Ramp Up Time is the time in seconds for the sweeping parameter (either Pulse Width or RPM) to sweep from the Start Value to the Peak Value. A value of zero is allowed. Ramp Down Time is the time in seconds for the sweeping parameter (either Pulse Width or RPM) to sweep from the Peak Value to the End Value. A value of zero is allowed. Start Value is the beginning value of the sweeping parameter (either Pulse Width or RPM). If the Ramp Up Time is zero, this will equal the Peak Value. Peak Value is the middle value of the sweeping parameter (either Pulse Width or RPM). End Value is the ending value of the sweeping parameter (either Pulse Width or RPM). If the Ramp Down Time is zero, this will equal the Peak Value. Test RPM is used in the Pulse Width sweeping modes to define a pulse rate. This control is not used when sweeping the RPM.
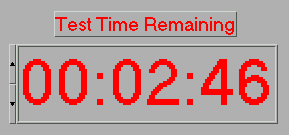
The Cycles Control allows the user to specify a test duration. In any of the "Timed" tests the units for the Cycles Control will be seconds. In any of the "Count" tests the units for the Cycles Control will be cycles (either output cycles (720 degrees) or sweep cycles). After entering a Cycles Limit value and starting a test, the indicator will count to Zero as the output Waveform cycle repeats. At count zero, the current cycle will be allowed to finish (either output cycles (720 degrees) or sweep cycles) and then all outputs will stop.
|
|
Send mail to
webmaster@CubicLabs.com with
questions or comments about this web site.
|