 CubicLabs, Inc. In- Vehicle Test, Measurement, and
Control
Equipment
CubicLabs, Inc. In- Vehicle Test, Measurement, and
Control
Equipment
![]()
![]()
For information, please send an email to:
or call:
(734) 426-0872
|
|
|
To change the operating mode, remove the two screws that secure the FV6 panel that has the external pots. Pull the panel and bezel and lay them on the table in front of the FV6. Be careful of the wires connected to the potentiometers. If desired, tilt the FV6 up slightly and slide off the top cover. The end of each channel’s card should be visible through the opening. It will look like this: 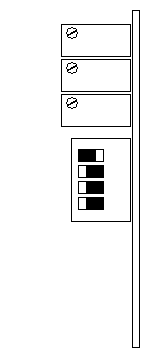
To change the operating mode, slide the corresponding switch to the right and all others to the left. If more than one switch is slid to the right, the channel will not be calibrated. Since the view of the channel cards is from the back, channel 6 is on the left and channel 1 is on the right. Once all the mode changes have been made, replace the top cover, if removed. Replace the panel and bezel and install the two screws. The FV6 is ready for use. |
|
Send mail to
webmaster@CubicLabs.com with
questions or comments about this web site.
|